
A Phase Detector Automatic Antenna Tuner Controller for 600 Meters
by W5JGV
First Posted 12 February 2011
Rev 1.10 - 13 February 2011
No more trudging out to the antenna tune in the dead of night to tweak the tuning.
One of the problems most 600 meter operators have to deal with is the unfortunate fact of life that the tuning of the antenna system changes frequently due to environmental conditions. Changes in the day/night moisture content of vegetation surrounding the antenna and varying moisture content in the soil can all result in the necessity to retune the antenna matching system. After suffering from this problem for several years, I installed a servomotor operated remote tuning system. The operation of the servo operated tuner was done by the operator (me) pressing the appropriate UP or DOWN button whenever I was in the shack and happened to notice that the VSWR was too high. This hit-and-miss system was not fully satisfactory, so I decided to construct something better.
The variometer in the matching system for the antenna for 600 Meter operation is operated by using plastic covered, braided stainless steel fishing leader wrapped around a pair of pulleys. One pulley is driven by the gear reduction system on the servomotor and the other pulley is on the shaft of the variometer. Since the variometer need only rotate through a 180 degree segment, the 24 volt servomotor is operated from a 12 volt power supply so as to run slower for a more precise adjustment. A pair of push-button switches commanded the servo motor to run in one direction or the other. For a long time I used this simple manual system without any limit switches, because I knew which way the motor had to run and since I was watching the meters, I knew not to overrun the tuning adjustment.
Eventually I found that serious events, such as storms, could cause severe detuning and cause the transmitter to trip off the air. On several occasions, the output transistors were destroyed when the detuning became really serious. It was time for an automatic tuning system.
In theory, the answer was simple. All I had to do was sample the transmission line current and voltage and determine the phase angle between them. If the samples were in phase, the antenna would be tuned to resonance. If the phase samples produced a negative value, the antenna would be tuned too high in frequency. If the phase samples produced a positive value, the antenna would be tuned too low in frequency. A simple comparator circuit would be able to determine the direction of the error and command the servo drive motor to run in the correct direction to bring the sample phase relationship back to zero.
Well, it was simple in theory at least, but I found that it was slightly harder to put into practice. The first step was to build a phase detecting bridge circuit that was relatively insensitive to variations in RF power levels. After several unsuccessful attempts to design such a circuit, (the junk ferrite cores I used were likely the problem) I chanced upon a ready-made solution to my problem.
Fair Radio (http://www.fairradio.com) sells a lot of interesting electronic surplus, among which is Part Number SWR-3349, described as "SWR / Discriminator." The cost was only $14.00, and it was supplied with a schematic diagram. That looked like it might work for my application, so I promptly ordered one. After a few days, it arrived on my doorstep. I quickly determined that the unit I received was a slightly different version than the diagram indicated. Internet searches failed to turn up the diagram specific to my unit, nevertheless, in the end, it worked perfectly.
The first thing I had to do was to adapt the unit to accept more standard RF connectors. (I apologize that I neglected to take any pictures of the connectors on the unit when it arrived. I was too interested in seeing if it would work!) As it is supplied, the unit uses small push-on RF connectors for which I had no mating connectors. After some careful disassembly, I determined that the entire connector could be removed by simply unscrewing the four small machine screws that attached the connector itself to the body of the unit. The center pin of the connectors simply plug into the transmission line inside the phase detector assembly. much as the standard Bird "QC" connectors plug into the Model 43 VSWR meter.
After some tinkering, I found that a #14 AWG bare copper wire was a snug fit into the phase detector line section. I fabricated a pair of mounting brackets, each of which would hold an SO-239 connector. Careful adjustment of the mounting holes let the rear of the connector fit snugly against the case of the phase detector, with the #14 wire plugged into the center line inside the detector case. A small length of insulating tubing was placed over the #14 wire close by the body of the SO-239 to prevent an accidental short circuit to the case. The metal mounting bracket for the SO-239 serves as the ground connection for the SO-239.
The unit provides three outputs, Phase, RF power level and RF presence detection. All of these outputs come out of the unit through a 15 pin connector. Fair radio was nice enough to supply the required connector with the unit. For my controller, I only required use of the phase detector output, so the remaining outputs were not used.
You may download a PDF copy of the technical description of the phase discriminator by clicking HERE.
You may download a PDF copy of the schematic diagram of the phase discriminator by clicking HERE.
Here is the bridge as I modified it. As you can see, it is quite small.

Here you can see the rough-and-ready bracket I made from scrap aluminum to hold the SO-239 connector.

Another view of the mounting brackets.

This shows how the brackets are attached to the bridge using the existing hardware.

A close up photo showing how close the connectors are mounted to the case. The clear insulating tube can be seen over the #14 wire from the connectors center pin.

Here is the modified bridge installed in the 600 Meter transmission line. RF power enters the bridge from the left and exits the bridge to the antenna on the right. My particular bridge did not work as well if the RF connections were reversed.
The control system has three parts; a Power Supply, an Op-Amp Buffer, and the Comparators.
To download a print quality PDF file of the power supply, please click HERE.
To download a print quality PDF file of the Op-Amp Buffer, please click HERE.
To download a print quality PDF file of the Comparators, please click HERE.

The power supply is a simple voltage regulated supply which provides plus and minus 5 volts. Since very little current is required, a simple half-wave rectification system is used for each voltage source. Because each rectifier diode draws current from the transformer during alternate half-cycles, the transformer sees a balanced load. Almost any small low voltage transformer will work. I used one which was salvaged from an old clock radio. It supplies about 7.5 volts AC. After rectification, the input filter capacitors charge up to about 10 volts, which is more than sufficient for the 7805 and 7905 regulators to function properly. Because of the low current drain from the supply, no heat sinks were required for the voltage regulators. The parts values are not particularly critical.

The completed power supply board. I used quick connect terminals to make installation easier.

The circuit of the buffer amplifier is shown here. Please note that on my particular phase detector, the pins for the output signal did not match up with the pin numbers shown on the diagram that was supplied with the unit. Your unit may or may not be different. The pins shown on the diagram, J2-2, J2-7, and J2-3 are the ones that worked for me.
BUFFER AMPLIFIER CIRCUIT DISCUSSION:
Op-Amp U1-A acts as a current-to-voltage converter with a voltage gain of about 1. The phase detector unit is rated to operate from about 20 to 400 watts. I am using mine at 200 watts. At that power level, the detector produces about 10 uA reading on a 50 uA meter for a line VSWR of 1.1:1. At a VSWR of 1.2:1, the reading increased to 20 uA, and at 1.3:1 VSWR, the reading was about 30 uA. The Op-Amp converts the 10 uA signal to about 1 volt at U1-A, pin1, the polarity of which depends on the direction of the phase error.
The current from the phase detector is converted to a voltage across resistor R1. Resistors R2 and R3 may be eliminated if desired.
Resistor R-trim is used if necessary to compensate for slight unbalance in the phase detectors internal bridge network. My unit was slightly off, and adding a 1000 Ohm resistor brought the reading back into balance.
Resistor R8 sets the full scale reading on the Phase Error meter. The meter is optional, but it is needed to calibrate the system, so I left it in the final design. R9 is used to dampen the free swinging meter needle. A 1 mA meter is shown in the diagram, but any convenient meter can be used. The meter needs to indicate full scale with about 1 volt applied to the meter. That results in roughly a half-scale reading when the VSWR error is 1:1.1.
Capacitors C3, C4, and C5 act as conventional bypass capacitors for the circuit to prevent unwanted oscillation. Due to the low gain of the circuit, no oscillations were detected even without the capacitors, but I included them just in case.
ADJUSTMENT AND CALIBRATION:
Start by making sure your antenna system is tuned to resonance. You will calibrate the phase detector to that reference point.
Insert the phase detector assembly in series with your transmission line. Be sure to insert it in the line in the correct direction.
Connect a microammeter across the bridge output connections, J2-2 to J2-7.
Apply about 200 watts to the transmission line. Make sure the antenna is still in resonance.
Note the reading on the microammeter. Ideally, it should read zero. It probably won't. Adjust the antenna tuning for a 1.1:1 VSWR reading and note the microammeter reading. Reverse the antenna tuning to the other side of resonance until you achieve a 1.1:1 VSWR. Note the microammeter reading again. This will tell you how out of balance your bridge is.
Turn off the RF power, and connect the phase detector bridge output to the inputs of your Op-Amp circuit.
Adjust the PHASE BALANCE and NO CARRIER BALANCE pots to mid range.
Power the amplifier up and adjust the NO CARRIER pot for a zero (center) reading on the PHASE ERROR meter.
Apply RF power to the transmission line / antenna system. Note the reading on the PHASE ERROR meter. Make sure the antenna system is still tuned to resonance and adjust the PHASE BALANCE pot for a zero (center) reading on the PHASE ERROR meter.
Shut off the RF power and readjust the NO CARRIER BALANCE for a zero (center) reading on the PHASE ERROR meter.
Note that the NO CARRIER BALANCE and the PHASE BALANCE adjustments interact somewhat, so you will have to repeat the adjustment sequence several times to get it just right. The goal of the adjustments is to achieve a zero (center) reading on the PHASE ERROR meter with no RF power, and a zero (center) reading on the PHASE ERROR meter with the RF power on and the antenna tuned to resonance.
If you cannot get things adjusted right, and you "run out of adjustment range" you may need to insert the R-trim resistor as mentioned earlier. When you finally get the adjustment right, you are done with this part of the circuit. Now it's time to go on to the Comparators.
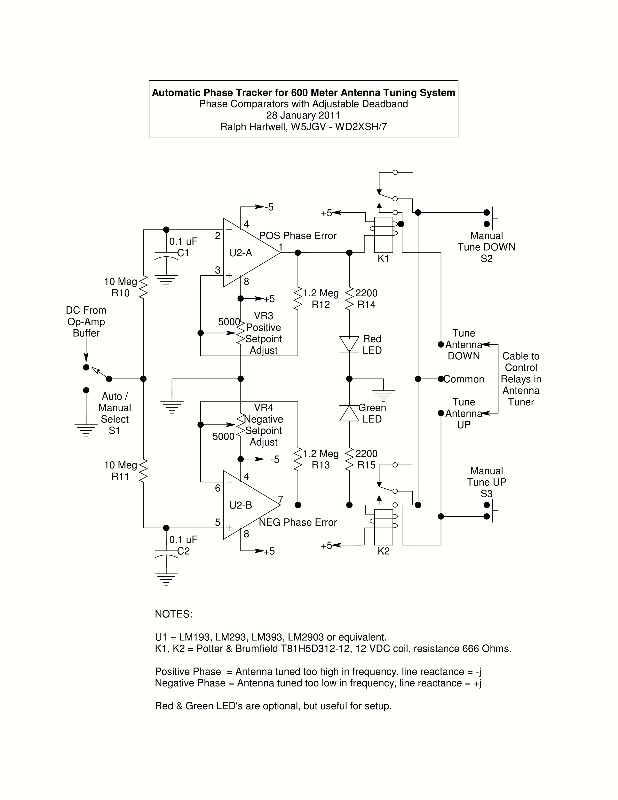
COMPARATOR CIRCUIT DISCUSSION:
The function of this circuit is to detect the polarity of the error signal so as to know which way to command the servo motor to drive the antenna tuner, and the magnitude of the error signal to know when to tell the servo system to run.
The DC error signal from the output of the buffer amplifier U1-A, Pin 1, goes through a switch, S1, which allows the operator to turn the auto tune function on or off.
The varying error signal goes through resistors R10 and R11, and is integrated by capacitors C1 and C2. When the polarity of the error signal is positive, comparator U2-A will be activated. Conversely, when the polarity is negative, comparator U2-B will be activated. The larger value capacitors C1 and C2 are, the slower will be the reaction time of the comparators. That is, they will ignore rapid changes in the error signal, but conversely, the comparator will stay triggered for a longer interval when it does trigger. To small a value can cause the comparator to oscillate back and forth about the setpoint value if the setpoints are adjusted "tight".
When the magnitude of the error voltage becomes greater than the setpoint comparison voltage provided by VR3 (positive error) and VR4 (negative error), the appropriate comparator's output pin will be pulled low, thus operating relay K1 for a positive error, or relay K2 for a negative error. Resistors R12 and R13 provide a small amount of hysteresis for the comparator action to prevent "hunting" and oscillation as the error voltage approaches the setpoint voltage.
A note here about the relays. Normally, this comparator IC cannot sink enough current to operate a relay directly because it is limited in the amount of current it can handle safely. In this case, the relay has a high coil resistance, about 600 Ohms. The relay is designed for 12 volts to be applied to the coil, but it operates quite well on 9 volts. In this circuit, +5 volts is always connected tom one end of the relay coil. The other end of the relay coil is connected to the output pin of the comparator. The output stage of the comparator is an open collector design, so it cannot source any positive voltage, it can only sink current. In this case, the emitter of the output transistor is connected to the -5 volt supply line, so when the transistor turns on, the transistor applies -5 volts to one end of the relay coil. That gives a total of 10 volts applied across the relay coil, which activates the relay properly. 10 volts across the 600 Ohm coil resistance causes a current of 16 mA to flow through the relay coil and the output stage of the comparator, which is within its allowable current rating.
The two indicator LED's and their associated resistors, R14 and R15 serve a dual purpose. They indicate that the comparator has closed it's relay, and they act as spike voltage suppressors across the relay coil.
ADJUSTMENT AND CALIBRATION:
Tune the antenna system to resonance, and be sure the error meter is reading zero, or center scale.
Set both Setpoint voltage potentiometers in the center of their range. If either LED is lit, rotate the appropriate Setpoint potentiometer until the LED just goes out, then turn it a bit more in the same direction.
Detune the antenna system slightly (about 1/4 scale deflection on the error meter) by pressing one of the Manual Tune buttons.
Adjust the appropriate Setpoint potentiometer so that the comparator triggers and the tuner returns the antenna system to resonance. Note that depending on the speed and sensitivity of your servo system, the tuner may overshoot the mark badly. In that case, you need to either modify the servo system so the tuner operates slower, or adjust the setpoint potentiometers to allow the system to get further off resonance before the comparator triggers. Reducing the values of C1 and C2 will reduce the lag, but may cause servo oscillations. Some "playing around" will likely be necessary here.
Repeat the adjustment for an error in the opposite direction using the other setpoint potentiometer.
CONSTRUCTION:

The Op-amp buffer, comparator stages and relays are all assembled on a single section of pre-punched circuit board. Point to point wiring is used. No special construction techniques were used. Screw terminals were used to make final assembly easier, although they are not necessary. Note that the power supply is on a separate circuit board.
![]()
The power supply transformer is mounted in one corner of the plastic enclosure that houses the completed unit. Note that there is no center tap required on the transformer secondary. The control relays may be seen at the top end of the circuit board.

The circuit boards and power transformer are shown here in the finished unit. The phase error meter, manual up/down switches, LED's and the auto/manual switch are all mounted on the front cover of the enclosure.

The mains power cord exits from the side of the enclosure. Also installed on the same side of the enclosure are the connectors for accepting the phase error signal from the phase error detector, and a 3.5 mm 3-conductor stereo jack for a standard stereo cable. This jack is used to send the relay contact closures to the servo system to operate the tuning drive motor.

The finished control system enclosure.

Here is the controller in service showing the cables connected to the unit. Note the phase error meter is indicating that the antenna is tuned just slightly low in frequency, and is indicating a +j error. The comparators will not switch to retune the antenna system until the phase error meter indicates an error about half way between the center scale zero phase error marker and either the (+) or (-) signs on the meter scale. In my tuner, the trigger error voltage equals a VSWR error of about 1.05:1. This is what I consider "tight" tuning.

This is the matching system for the 72 foot vertical antenna at W5JGV / WD2XSH/7.
The 600 meter components are the top 10 turns on the edge wound vertical coil at the upper left of the picture. This coil is connected to the white variometer seen in the upper right of the picture. The output of the variometer passes through the rear of the cabinet, and then on to the main loading coil. Then the RF comes back into the cabinet and passes through the large yellow powered iron core which is a current transformer for my remote RF ammeter to read the antenna current.
The variometer is operated by the small servomotor system which is seen in the extreme upper left of the cabinet, in front of, and to the left of, the edge wound coil. If you look closely, you can see the thin black fishing line that runs between the white pulley on the variometer and the gray drum on the servo system.
Also, note the additional length of fishing line which is attached with a silver clamp assembly to the top of the variometer drive wire. (The clamp is seen in front of the right hand support bar of the vertical edge wound coil.) This extra line goes to the right wall of the tuning cabinet and passes through a plastic block, then through the actuating levers of two snap action switches which act to limit the rotation of the variometer.
After passing through the switch levers, the fishing line connects to a small cast lead weight. The weight keeps the line taut, and provides enough weight to trip the lower switch when the line is paid out by the servomotor drum.

The limit switches are mounted on a section of HDPE plastic cut from a kitchen cutting board. The plastic mount is bolted to the tuner cabinet wall. The plastic block that acts as a 90 degree bearing point for the fishing line may be seen at the top of the photo to the right of the variometer, which is seen in the center of its tuning range. A pulley would have been more mechanically appropriate, but in this case, the movement of the fishing line is very slow, and the friction is low enough so that a simple rounded surface for the line to slide over was adequate. The two limit switch trippers may be seen on the fishing line between the two switches. The switches were salvaged from a discarded microwave oven.

The lever on the switch was flattened and then a small clearance hole was drilled through it to allow the fishing line to pass through it. Both sides of the drilled hole were chamfered to prevent abrading the line during operation.

The switches are tripped by a simple arrangement consisting of two flat washers which are clamped against the fishing line by using a machine screw and a nut. This allows for easy adjustment of the switch trip points should it be necessary to change the setting.

This is the little servomotor system that I use to drive the variometer. It was salvaged from a defunct vacuum variable capacitor assembly. I attached a length of PVC pipe to the large gear. The drum takes about 30 seconds to revolve through the one turn necessary to operate the variometer through the half-turn it requires to go from minimum to maximum inductance.
73, Ralph W5JGV
[Home]
The entire contents of this web site are Copyright © 2002 - 2011 by Ralph M. Hartwell II, all rights reserved.